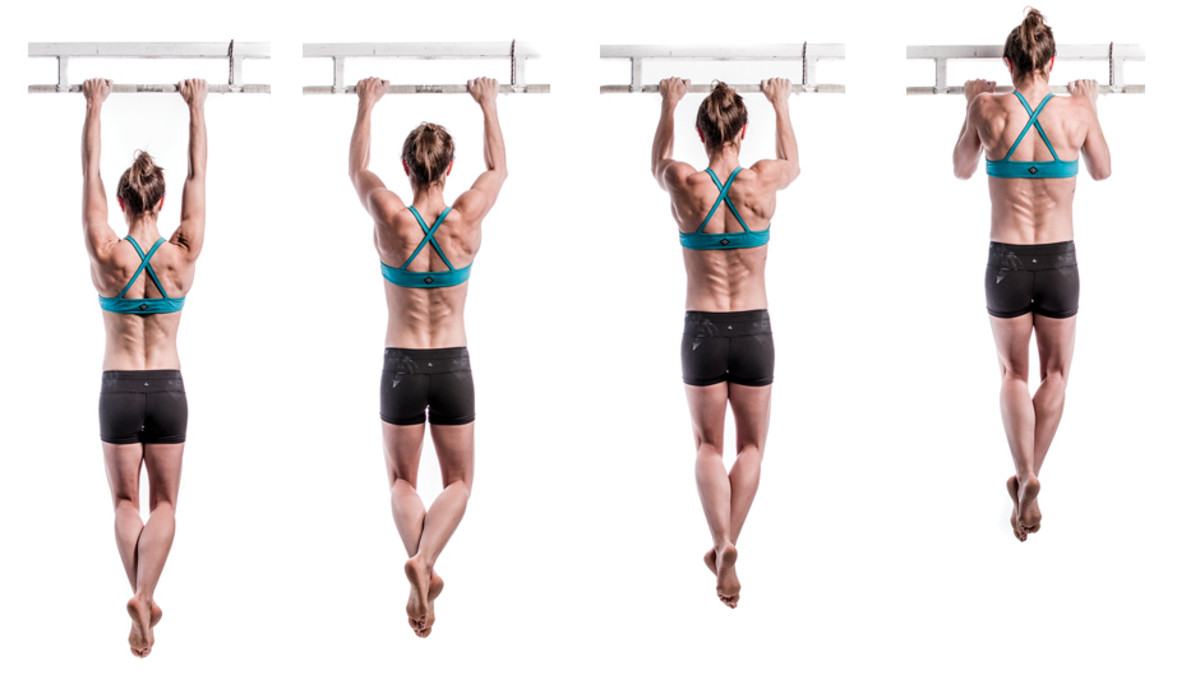
Doing a single pull up is a challenge for most women and even some men. It requires good upper body strength and a reasonable bodyweight. For those who are training to do their first pull up, it can seem like an insurmountable task going from 0 to 1 rep. It’s difficult to gauge progress when you’re unable to do a single rep in any exercise. Fortunately there are a number of ways to build pull up strength without some fancy anti-gravity machine. All you need is time, effort, a bar and maybe a pulley.
First the obvious. If you’re overweight you’ll need to get that in check (or be prepared for a heavier pull). How much bodyfat you carry is based primarily on what you’re eating. Nutrition is outside the scope of this article and I’m sure you can find plenty of diet info on the net. I’ll just say eat more plants and animals, and less sugar and processed foods. Do cardio. Work for more intense conditioning rather than longer duration (45+ min). High intensity interval training (HIIT) is a good option. 3 days per week in addition to your strength training.
Pulling Strength
If you need to drop some bodyweight, you can do that while you start to work on your pulling strength. Lat pulldowns are where to begin. If you are new to this kind of training you can start with 2 sets of moderately higher reps in the 10-12 range. Do this 2-3 times a week for a week or two and move on to heavy weights with fewer reps and more sets; work up to 5 sets of 3-5 reps. Once you get to about 60-75% of your bodyweight on the lat pulldown you are ready to start working negatives from the bar. If you are already at that point now, skim through the next two paragraphs on abs & grip and start focusing your training on the negatives & isometrics section.
Abs
The only drawback to using the lat pull down is you will have limited core engagement and to do a pull up you will need to tighten your midsection. This is in part because of the intense exertion your first pull up will require and also because without tight abs your legs will not come up easily. It’s almost as if you would be lifting two separate objects, your upper and lower halves. You will have more success lifting your body as a single unit. So in order to learn how to engage the abs you will perform hanging leg lifts. First start with knee raises and then move to strait leg lifts. Again, moderate rep ranges for 2-3 sets, ultimately working towards toe-to-bar reps.
Grip
Another benefit of doing hanging anything is the grip strength that you’ll build. You’ll need that if you expect to do a pull up. So no lifting aids here – the more time you spend hanging, either flexed arm or strait, the better. As your grip strength increases so will your full body strength. Yes, grip strength is a good indicator of body strength and it has been said that strengthening your hands is the fastest way to strengthen your entire body (by way of neuromuscular efficiency). There are many ways to get a stronger grip but if your goal is to do a pull up you best strengthen your grip by hanging. Finish up your leg raises with some hangs for time – 1 or 2 attempts is enough.
Negatives & Isometrics
Resisting gravity is always easier than overcoming it. That is, you can lower more weight (negative) than you can lift. You can also hold more weight in a static position (isometric) than you can lift. Have you ever taken a set to the point of failure where the weight grinds to a halt and you slowly lower it back down? That is an example of how you can hold and lower a weight you cannot lift. Performing flexed arm hangs and negative only pull ups is the best way to build the strength required to do your first pull up. In addition to strength, you begin to “groove” your pull up technique.
Negatives and iso’s should be done in relatively small doses as they are intense. Remember, you’re using a weight that exceeds your 1RM so start with 5-10 second holds and/or 3-5 negatives. Do NOT train to the point where you can no longer lower yourself under control. Take as much as 2-3 minutes between sets and work up to 5 sets of 3-5 negatives with a brief pause at the top of each rep.
Partials
After you’re able to do at least 10 negatives (total) without crashing, you are ready to start working partial reps. Let’s start from the top… position yourself on a stool or chair that places your chin about 4″ below the bar. Pull from there for 3 sets of 3 reps. Add a set each week until you can do 5 sets of 3 reps and then increase your range of motion. Position yourself about 8″ from the bar and start over at 3 sets of 3 reps. Again, add a set each week until you get to 5. If necessary, repeat this process from 12″ below the bar before moving to the full range of motion.
Technique
You’ve seen pull ups done in a variety of ways and it should be noted that some ways are more difficult than others. Generally speaking, palms away (pull ups) will be more difficult than palms facing you (chin ups) which will be more difficult than palms facing each other (parallel grip). It depends on what you train for though so pick a grip and stick with it.
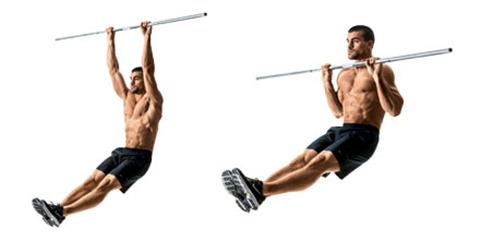
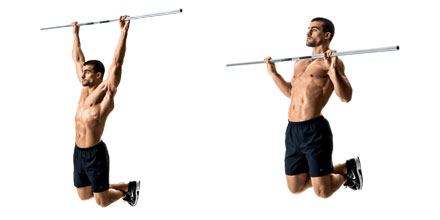
Something that might not be as obvious as hand position is the body position. The hollow body position is recommended as the strongest position to pull from. Although this is a very important point, try not to overthink it. You should have already found this position in your hanging leg lifts but it basically consists of a sunken chest with shoulders rounded and legs forward.

Hollow Body Position

Not a Hollow Body
Doing a pull up is a skill and you get better at what you practice. So it’s important to remain consistent in your technique. It’s unlikely that exercises that do not closely mimic a pull up will produce any measurable results. And a kipping pull up is nothing like a strict pull up. “Kipping” is an advanced skill that crossfit uses for competition and has a less favorable risk-to-benefit ratio. If you cannot do a strict pull up you have no business kipping, so don’t even try or else shoulder problems await you.
Another technique people employ is the use of bands to assist in the pull up. My experience has taught me that most people struggle with the top end of the pull up, that is, those last few inches before the chin is over the bar. Rubber bands only offer assistance at the bottom end, where the arms are strait, so band assisted pull ups do not target the range that needs improvement. Bands could provide *some* benefit, but I wouldn’t make that a primary training focus.
Training Cycles
Understand that there is no program that will allow you to make progress indefinitely. You cannot set a personal best every workout, forever. This is why advanced lifters and trainees cycle their routines. The idea is to push hard for 6 weeks or so and then have a rest week where you take light workouts only. Many popular workouts these days call for entirely new programs as to create “muscle confusion” but in this case that’s the last thing you want. If your goal is to do a pull up, that’s pretty specific, and you’ll need to base your workouts around that very exercise. Just remember to cycle the intensity. Training hard for a month or two, and back off for a week. Repeat as necessary.
The above outline could be easily be a years worth of training to get a single pull up, depending on how much you weigh and your current level of strength. There will be some people that will need to spend months doing lat pull downs before they are ready to do a single negative and there will be others that can start doing partial reps immediately.
If you are a woman, training to do your first pull up could take some time. It’s considered a strong measure of a woman. It’s a great long term goal for most.
If you are a man, and you can’t do a single pull up, your ancestors are dismayed by your lack of physicality… but don’t fret! This is a goal that is probably not far off. Anyone under 300lbs should be able to get a pull up in a few months of training. Follow the above plan and you are well on your way!
*For a limited time I’m giving away my Pull Up Progressions workout for FREE. Go to https://baltimorekettlebellclub.com/product/pull-up-program/ to download it now.
